
Oh, my dear friend, there is a very specific kind of satisfaction that comes from carefully repairing something you could have easily thrown away.
Maybe it’s a favorite blouse with a popped seam. Maybe it’s a pair of trousers that needs a little alteration. Or perhaps it’s a much-loved piece of clothing that simply needs a second chance.
For me, those little repairs bring back memories of my grandmother’s sewing room—the soft hum of her old machine, colorful spools of thread lined up neatly nearby, and that wonderful old-fashioned belief that if something could be repaired, there was no reason to replace it.
And one of the smallest tools in that sewing basket was often one of the most useful:
The humble seam ripper.
It looks almost too simple to be important. But once you know how to use it properly, this little tool can make removing stitches surprisingly easy.
The secret isn’t force.
It’s technique.
So grab your sewing basket, put on your reading glasses, and let’s take a closer look at how to use a seam ripper without damaging the fabric you’re trying to save.
What Is a Seam Ripper?
A seam ripper is a small sewing tool designed to cut and remove stitches.
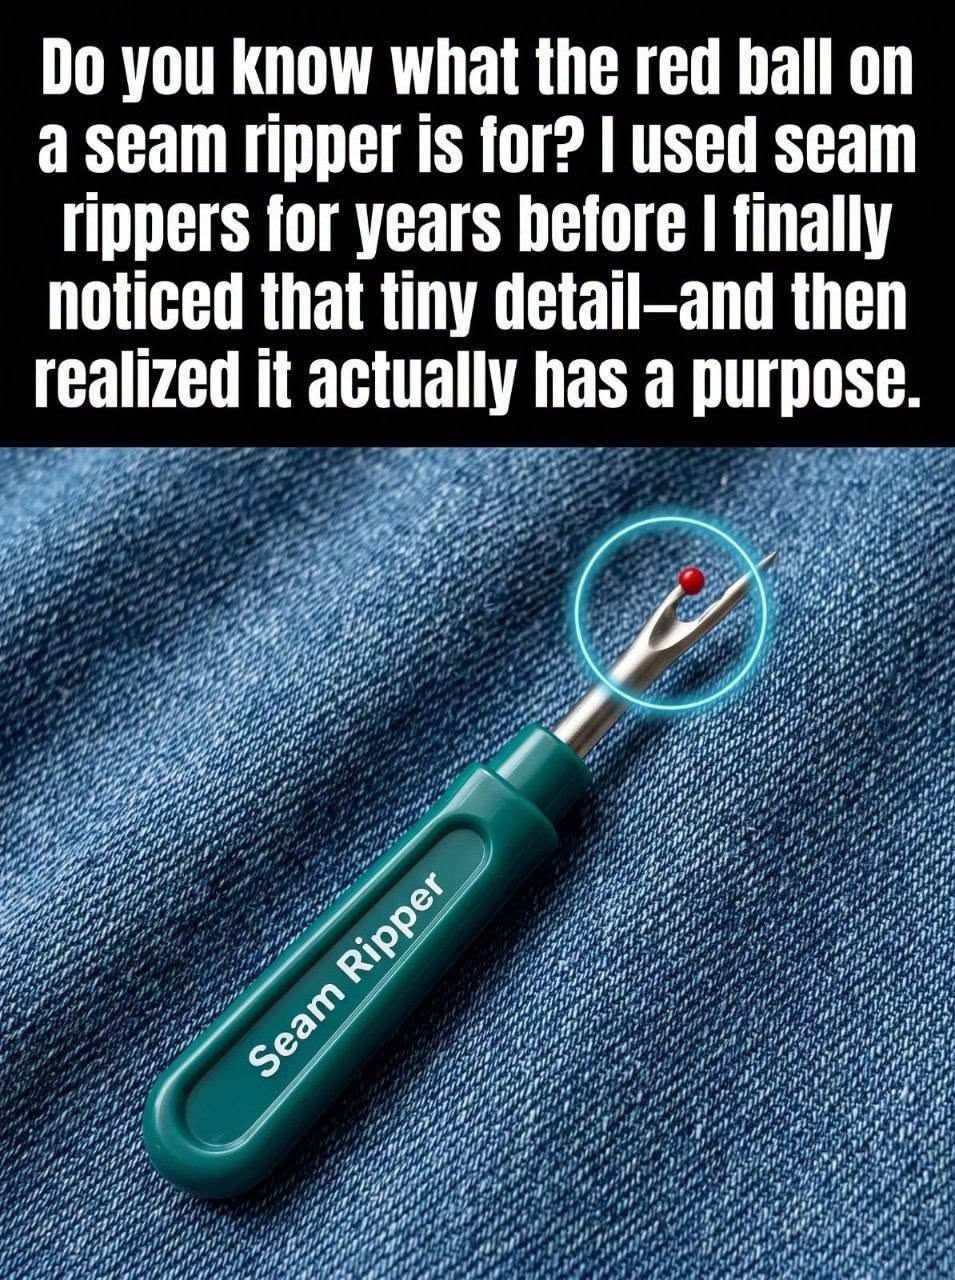
It typically has a handle and a forked metal tip with two points:
One point is sharp and pointed.
The other is longer and usually has a small protective ball on the end.
Between them is a curved cutting edge.
That little cutting edge is what slices through thread.
The tool is particularly useful when you need to remove:
A sewn seam
A hem
Incorrect stitches
Basting stitches
Embroidery stitches
A zipper seam
A section of stitching that needs to be redone
And despite its name, the goal isn’t to “rip” fabric.
You’re really cutting the thread while protecting the fabric.
How Does a Seam Ripper Actually Work?
How Does a Seam Ripper Actually Work?
Here’s the clever part.
The seam ripper isn’t designed to require much force. Its shape allows you to position the cutting edge underneath a thread and use a small movement to sever it.
The Sharp Point
The pointed end helps you get underneath or between individual stitches.
The Protective Ball
The longer prong often ends in a small rounded ball.
When used correctly, that rounded tip can slide against the fabric while the cutting edge moves toward the thread. It helps reduce the chance of accidentally catching the fabric with the sharp portion.
The Curved Cutting Edge
The cutting edge sits between the two prongs.
Once a stitch is positioned against that edge, a gentle forward motion can cut the thread.
That’s why you shouldn’t need to muscle your way through a seam.
If you’re using a lot of force, it’s usually worth stopping and repositioning the tool.
Why You Shouldn’t Just Pull the Seam Apart
This is one of the biggest mistakes beginners make.
It can be tempting to grab both sides of a seam and pull.
Please don’t.
Pulling aggressively can stretch the fabric, distort the seam line, or cause threads to catch and pull fibers from the fabric.
A seam ripper gives you much more control.
Instead of fighting the garment, you’re simply removing the individual stitches that are holding the fabric together.
And once you get the hang of it, it’s surprisingly relaxing.
How to Properly Use a Seam Ripper
Ready?
Let’s take it one stitch at a time.
1. Turn the Garment Inside Out
Whenever possible, turn the garment inside out before beginning.
The underside of the stitching may make individual threads easier to see, depending on how the seam was sewn.
Place the section you’re working on somewhere flat and well lit.
Good lighting makes this job considerably easier!
2. Identify the Stitches You Want to Remove
Before cutting anything, look carefully at the seam.
Decide exactly where you want the stitching to stop and start.
This is especially important when you’re opening only a small section of a seam.
You don’t want to remove ten inches of stitching when you only needed two.
3. Slide the Point Under a Stitch
Hold the seam ripper comfortably in your hand.
Use the pointed end to carefully get underneath one stitch.
You don’t need to force it.
Gently work the point beneath the thread until the stitch rests against the cutting edge.
4. Cut the Thread
Once the stitch is positioned correctly, use a small, controlled movement to cut the thread.
You should feel very little resistance.
That’s the beautiful thing about a seam ripper—it doesn’t need brute strength.
If you’re struggling to cut the stitch, reposition the tool rather than pushing harder.
5. Continue Along the Seam
Move to the next stitch and repeat.
For a long seam, you don’t necessarily have to cut every single stitch individually.
A useful approach is to cut several stitches at intervals, then gently separate the seam and remove the remaining loose threads.
The key word here is gently.
6. Pull Away the Cut Threads
Once enough stitches have been cut, carefully separate the fabric layers.
Many of the remaining threads should come away easily.
A pair of small thread snips or tweezers can help remove stubborn pieces.
7. Check the Fabric
Before moving on to your repair or alteration, inspect the fabric carefully.
Look for:
Loose threads
Pulled fibers
Small holes
Snags
Stitches you accidentally missed
If everything looks good, you’re ready for the next step.
The Most Important Seam Ripper Rule
Here’s the rule I wish every beginner knew:
Let the tool do the work.
A seam ripper is sharp.
You don’t need to push hard.
You don’t need to saw aggressively.
And you certainly don’t need to rush.
A gentle, controlled motion gives you much more precision and reduces the risk of accidentally cutting the fabric.
If the ripper doesn’t glide underneath the stitch easily, stop and reposition it.
How to Avoid Cutting the Fabric
This is probably the biggest concern when learning to use a seam ripper.
After all, what’s worse than trying to remove one little stitch and accidentally putting a hole in your favorite shirt?
Keep the Fabric Taut
Don’t stretch it aggressively, but keep the area reasonably flat and supported.
This makes the stitches easier to see.
Work Under Good Light
Natural daylight is wonderful for sewing, but a bright task lamp works beautifully too.
Use the Protective Tip Correctly
When possible, orient the seam ripper so the rounded protective ball is between the cutting edge and the fabric as you move beneath the stitch.
The exact angle depends on the seam and fabric, so don’t force the tool into a position that feels awkward.
Cut Threads, Not Fabric
Keep your attention on the thread you’re targeting.
The goal is a tiny cut—not a dramatic swipe through the seam.
Should You Cut Every Stitch?
Not necessarily.
For a short seam, cutting individual stitches may be easiest.
For a longer seam, you can often cut stitches at intervals and then gently pull the seam apart so the remaining threads become easier to remove.
However, delicate fabrics deserve extra care.
If the fabric is fragile, stretchy, loosely woven, or expensive, slow down and remove fewer stitches at a time.
What If the Thread Is Really Tight?
Don’t force the seam ripper underneath.
Instead, look for a place where you can access an individual stitch more easily.
You can also gently loosen the seam with your fingers before inserting the tool.
Remember:
Resistance is a signal to reposition—not a reason to push harder.
How to Use a Seam Ripper on a Hem
Hems are one of the most common reasons people reach for a seam ripper.
Turn the garment inside out and locate the hem stitching.
Work from the underside and carefully cut the stitches along the section you want to open.
Once enough stitches are removed, gently unfold the hem.
You may notice small holes or crease lines where the previous stitching was located. Depending on the fabric, these may become less noticeable after gentle pressing.
How to Remove a Zipper
A seam ripper can also be useful when replacing or adjusting a zipper.
This requires more care because zipper stitching is often close to the garment fabric.
Work slowly.
Cut only the stitches holding the zipper in place, and frequently check that the cutting edge isn’t catching the fabric underneath.
If the zipper is sewn through several layers, take your time and separate the layers as you work.
How to Remove Basting Stitches
Basting stitches are often longer and easier to remove than permanent stitching.
Insert the seam ripper beneath a stitch and cut it.
Because basting stitches are usually longer, you can often pull away the loose thread once you’ve cut several sections.
This is one of the easiest ways to practice if you’re new to the tool.
What Fabrics Need Extra Care?
Some fabrics are much less forgiving than others.
Be particularly cautious with:
Silk
Satin
Chiffon
Lace
Very lightweight cotton
Knits
Loosely woven fabrics
Vintage clothing
With these materials, even a tiny accidental cut can become noticeable.
For delicate or valuable garments, practice on a scrap piece of similar fabric first.
Common Seam Ripper Mistakes
Using Too Much Force
A seam ripper should cut thread with relatively little effort.
If you’re pushing hard, stop.
Cutting Toward Yourself Carelessly
A controlled movement is safer than a large sweeping motion. Keep your fingers out of the path of the sharp point.
Trying to Cut Several Layers at Once
Separate the layers whenever possible.
Working in Poor Lighting
Tiny stitches can be difficult to distinguish from the fabric itself.
A good light can make the job much easier.
Rushing
This is one sewing task where patience really pays off.
One tiny stitch at a time is better than one big accidental hole.
How to Hold a Seam Ripper
There isn’t one single correct grip.
Hold it in whatever way gives you the best control.
Many people hold it much like a pencil or small craft tool, using their thumb and fingers to guide the tip.
The important thing is that your grip should feel relaxed.
You should be able to make tiny movements rather than large, forceful ones.
How to Choose a Good Seam Ripper
If you’re buying your first seam ripper, you don’t need anything fancy.
Look for:
A comfortable handle
A sharp, clean cutting edge
A smooth protective ball
A size that feels easy to control
A protective cap if one is included
A larger handle may be more comfortable if you have difficulty gripping very small sewing tools.
And please keep the protective cap whenever your seam ripper comes with one.
That tiny sharp edge deserves a safe home when it’s not being used.
What Can You Use Instead of a Seam Ripper?
If you don’t have a seam ripper, small embroidery scissors or sharp thread snips can sometimes remove stitches.
But a seam ripper is specifically designed for this job, and its shape gives you excellent control.
I wouldn’t recommend using a kitchen knife, razor blade, or other improvised sharp object.
Sewing tools are inexpensive compared with repairing a cut garment—or a cut finger.
A Little Sewing Wisdom Worth Remembering
There is something wonderfully old-fashioned about repairing clothing.
We’re so accustomed to replacing things that it’s easy to forget how satisfying it can be to make something useful again.
A seam ripper represents the opposite of rushing.
You sit down.
You look carefully.
You remove one stitch.
Then another.
And slowly, the mistake disappears.
Maybe that’s why I find sewing repairs so calming.
There’s something reassuring about knowing that not every little problem requires throwing something away.
Sometimes all it needs is a few minutes, a little patience, and the right tool.
Frequently Asked Questions
What is the little ball on a seam ripper for?
The rounded ball is designed to help protect the fabric as the seam ripper is positioned beneath stitches. It can help keep the sharp cutting edge from unnecessarily contacting the fabric.
Which side of a seam ripper cuts?
The sharp curved edge between the two prongs is the cutting portion of the tool.
Can a seam ripper cut fabric?
Yes, if used incorrectly or with excessive force, a seam ripper can cut or snag fabric. That’s why controlled movements and proper positioning are important.
Should I use the seam ripper from the front or back?
The underside of a seam is often easier to work on because the stitch structure may be more visible there.
Turning a garment inside out is a useful starting point, but the best side depends on the construction of the particular seam.
Can I use a seam ripper on jeans?
Yes. A seam ripper can remove stitching from denim, although heavy-duty seams may take more patience.
Can I use a seam ripper on stretchy fabric?
Yes, but use extra care. Stretch fabrics can snag or distort more easily, so keep the fabric supported and avoid pulling aggressively.
How do I remove tiny leftover threads?
Tweezers, thread snips, or your fingers can help remove loose threads after the main stitching has been cut.
Is a seam ripper dangerous?
Like any sharp sewing tool, it can cause an injury if handled carelessly. Keep the point directed away from your fingers, use controlled movements, and store it safely when finished.
Final Thoughts
A seam ripper may be one of the smallest tools in a sewing basket, but don’t let its size fool you.
Used correctly, it gives you the ability to undo a crooked seam, fix a mistake, alter a garment, replace a zipper, or simply give an old favorite another chance.
And there’s something rather comforting about that.
You don’t have to get everything perfect the first time.
You can sew a stitch, take a step back, realize it isn’t quite right, and simply undo it.
One little thread at a time.
So the next time you find yourself staring at a seam that needs fixing, don’t be intimidated by that tiny tool.
Pick up the seam ripper, slow down, and let the tool do the work.
Your fabric—and your patience—will thank you.